GitHub repository for the viewer can be found here.
What is this?
This project is an interactive simulation for visualising 4D geometry. See report.pdf for a full writeup about what this project is and how it was made. This was really interesting to make as GLSL did not support 5x5 matrices used to manipulate the 4th dimension, and so I had to essentially write matrix mathematics in the shader code in order to get this to work!
How do I use it?
Use WASD to move the camera with space and c to go upwards and downwards. Hold down the right-mouse-button and move the mouse to look around the simulation (much like an FPS game).
Pick a polytope from the menubar in the top left and then use the transformation window to manipulate it. Changing the settings of the 4D camera will also change the appearance of the object — as an exercise to the reader, I highly recommend translating the shape and then moving the 4D camera to correct it!
How does it work?
Perceiving the 4th dimension
In order to see a 4D object, a 4D object needs to be created. The tesseract is a 4D hypercube and is suitable as the main polytope for this project. For this project, I want to perform projections and other transformations using GPU shaders like you would for an ordinary game. A 4D camera can be used to view the fourth dimension from various positions and angles and is just as useful and important as a 3D camera in any 3D game. Next, a projection matrix is used to project vertices into the third dimension, where it is then perceived by a separate, 3D camera and then finally projected to 2D for rendering on screen. Getting all of these steps correct is difficult as they cannot be worked on independently and tested easily — it is the sum of these steps that achieve even the simplest result.
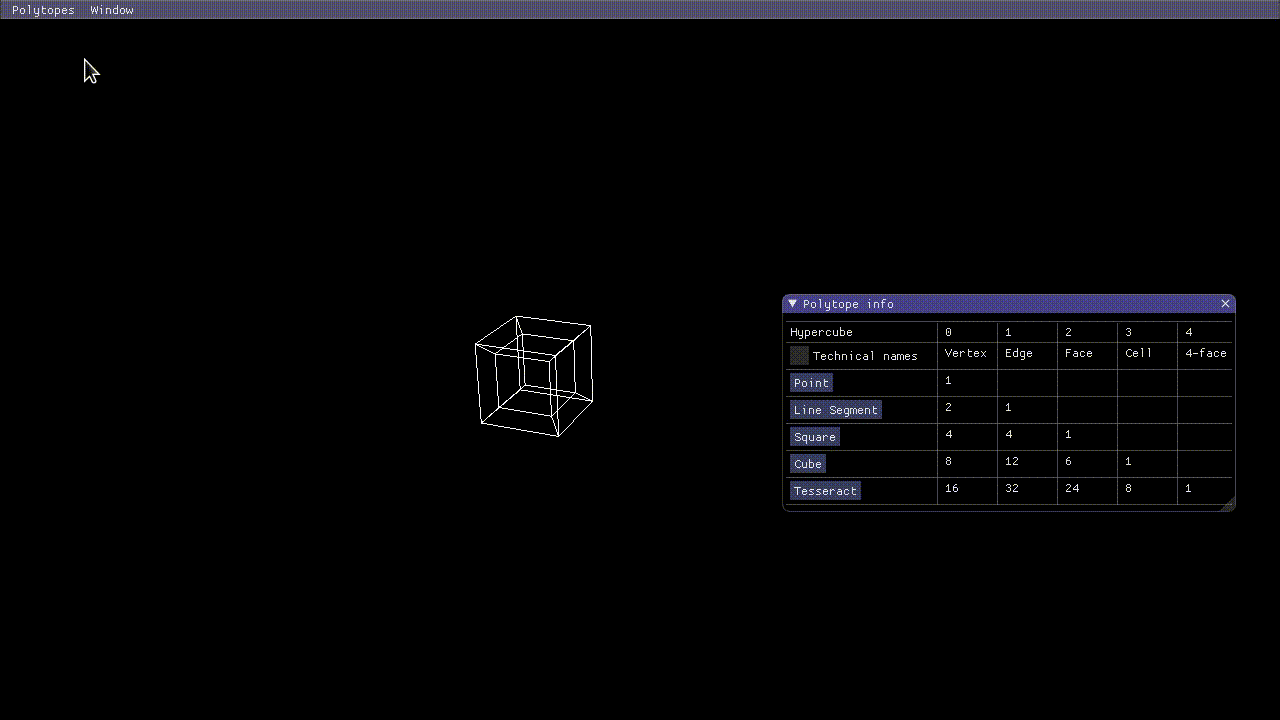
Identifying polytopes
Each dimension of the polytope can be examined via scaling.
For each polytope there is a set of information that describes the number of vertices, edges, faces and cells of not only the 4D shape but also each variant of the same polytope such as a line, a square and a cube — while this information is trivial, being able to compare the geometry between each shape does help create an understanding of what a higher dimension means. Furthermore, clicking the name of each shape scales the rendered polytope such that a cube would get flattened into a square, for instance. I hope that small details like this inspire interest in the user to learn more about the relationships between dimensions.
Camera movement
Videos showcasing usage of the 3D and 4D cameras.
While moving the 3D camera acts as you’d expect, moving and turning the 4D camera can appear to twist and deform the object without necessarily moving it. While this project doesn’t include any theories about the meaning of the fourth dimension, one way to think about it is looking at the same object but from a different point in time — it would not move, but simply changing the time of observation can impact an object one is looking at.
4D transformations
In the transformation window, the user can specify different types of transformations to be applied to the object — the product of all these transformations can be seen in the matrix at the top of the window. This is the exact matrix that is sent to the GPU along with the view and projection matrices from the cameras. There are multiple tabs in the transformation window to modify each transformation separately. While they are mainly self-explanatory and just involve dragging values to increase or decrease them, there are some notable features of some transformations.
The four included transformations: translation, rotation, scale and shear.
How do I compile it?
This project was created using CMake to be cross-platform.
Visual Studio:
Using Visual Studio, right click inside the folder and select open cmake project in Visual Studio (or something like that). For more information, check this.
Command line:
You need to create a build directory and then generate some makefiles before you can begin compilation. The full process looks like this:
mkdir build && cd build
cmake ..
make
./App